Sharkoon Elite Shark CA300T Review
On the back, besides enough space for cable management, is SSD, but also two HDD. You also get two standard USB 3.1 slots and one USB 3.2 Gen 2 Type C slot.
With high-end components, you should definitely put high-end Cases so that everything ends up in one attractive whole.
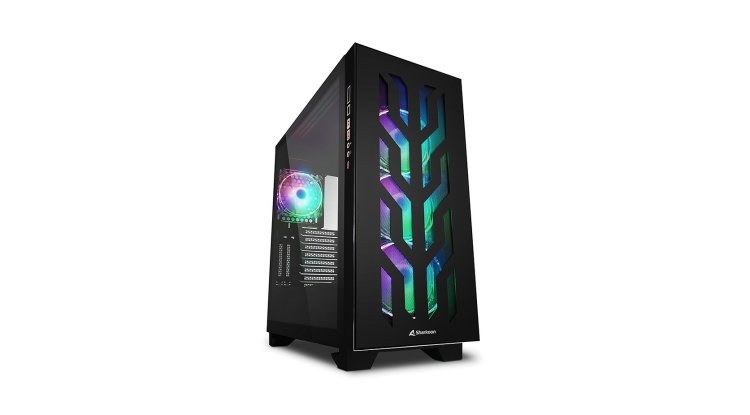
It is always important to have one product that stands out, “flagship”, so to speak. For Sharkoon, this is definitely the Elite Shark CA300T. It is a mid-tower case for any average ATX build that offers you a large number of options when adapting to your own taste.
So, it is a slightly larger bucket with dimensions of 50.5 x 23.5 x 52 cm, so it quickly becomes obvious that it brings enough space to stack a visually attractive housing in which all unwanted details can be hidden. You will first notice that the case weighs a whopping 15 kg completely empty because there is no piece of plastic on it, so it is all made of metal construction, which guarantees longevity, but also the weight of carrying. Also, in the test, we have a white version with black details, while a completely black version can be found on the market.
Let’s move on to the front, where they cut a unique repeating pattern from one metal plate that makes the case unique, and yet gives it just enough space to breathe given the size of the cutout. Of course, where the air can pass, there is a metal mesh that will catch dust, and it is easy to clean because it is on the very surface of the case. Under the front cover, you have a lot of space to install radiators up to 420 mm long, or flat radiators with up to three 120 mm or two 140 mm fans. It’s the same with the top of the case, but you’ll still need up to a 360mm radiator.
Speaking of the upper side, it therefore consists of a perforated metal cover that is hooked from the back like a traditional side of the case, with two screws. Once you remove it, you come to a dust filter that protects the upper space for up to three 120 mm fans or two 140 mm. But other than that, once removed it opens the way for the glass sides on the left and right to be lifted and removed from the case, as they are held in guides that ensure they don’t accidentally fall off the case.
Looking at the case from the side, once the glass is removed, we see that we have a cover at the bottom that hides the power supply, and up to three disks can be installed on this side. It is also easy to notice the space for vertical installation of the graphics card so that it can stand out better. Along the height of the right side we have a black metal plate to hide the cable management, and removing the plate reveals enough slots for installation and fixing custom water cooling. Of course, there is also an additional holder for larger and heavier graphics cards, which will be necessary given the latest models introduced. The back of the case has space for one 120 mm fan, which is already pre-installed, but the height can be adjusted according to the build.
A few interesting details for the end, on the back, besides enough space for cable management, you get extra space for SSD, but also two HDD. Here you will also see a custom RGB controller for the case that can be controlled by the motherboard, but by default, it is controlled by the “reset” button on the case and changes the RGB lighting with fans. You get four fans, three for suction and one for exhausting air, which we consider a good setup to start with. The front I/O is on the main side of the case, because it is expected that this kind of build will be on the table, next to the monitor. You also get two standard USB 3.1 slots and one USB 3.2 Gen 2 Type C slot.
